Deploy a static site: Synchronize the dev environment to S3 buckets using AWS CLI [Part 3]
This is the last part, Part 3 of a 3-part series. In the previous part of this blog, we created a Cloudfront distribution, requested an SSL certificate for HTTPS, then restricted access to the S3 bucket with origin access control. Then we wrote a Cloudfront Function to manipulate the request URI to include a default object (index.html) to make it all work. Now we have a safer and better hosting solution. But you know what would be annoying still? If we had to log on to AWS with our IAM user account, do its little mandatory dual authentication dance, then browse to the bucket just to delete all of its contents, then drag and drop new files to replace. It might not be immediately obvious exactly which files have been changed to do a more targeted approach, unless we scroll through git diff or come up with our own object versioning.
Wouldn’t it be nice to upload all of our files with a single command on the console? Wouldn’t it be nice to be able to push only files that have been changed, and delete files that are no longer necessary to keep request and storage costs down? We might even integrate this into a cron job and run it on a schedule.
Well it turns out that we can with the AWS command line interface (CLI).
See the other posts:
- Part 1: Static website hosting using AWS S3.
- Part 2: HTTPS to an S3 origin the right way using AWS Cloudfront.
- Part 3: Synchronize the dev environment to S3 buckets using AWS CLI.
Create an Identity and Access Managment (IAM) user
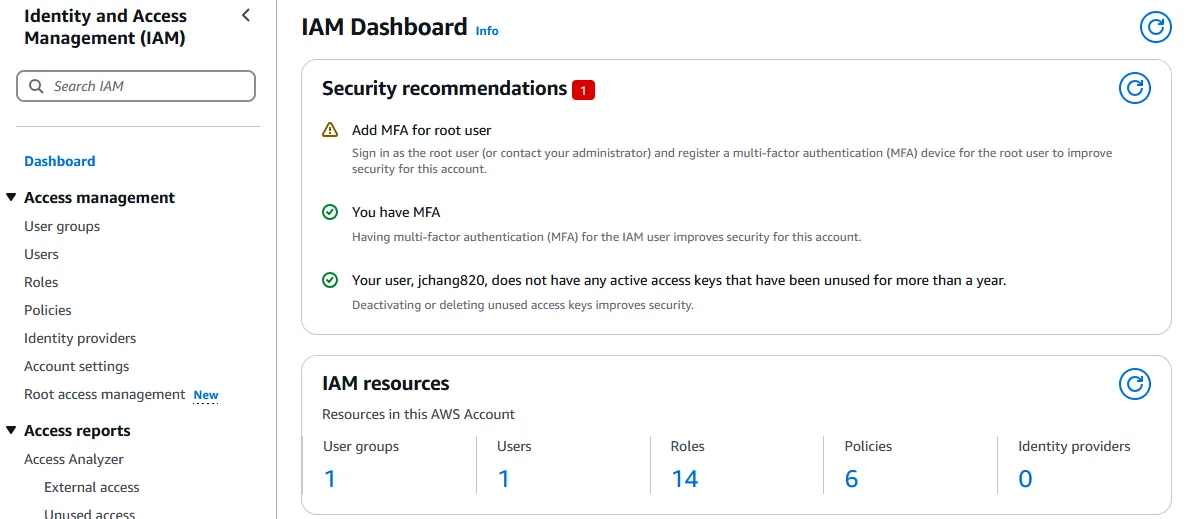
Security best practices dictate to stop using the root user account. Therefore, we are going to create an IAM user role with administrative privileges that can do nearly anything the root user can besides some accounting access and such. To do this, we find the IAM Dashboard.
-
Click on “User” on the menu to the left, and the press the “Create user” button on the top right.
-
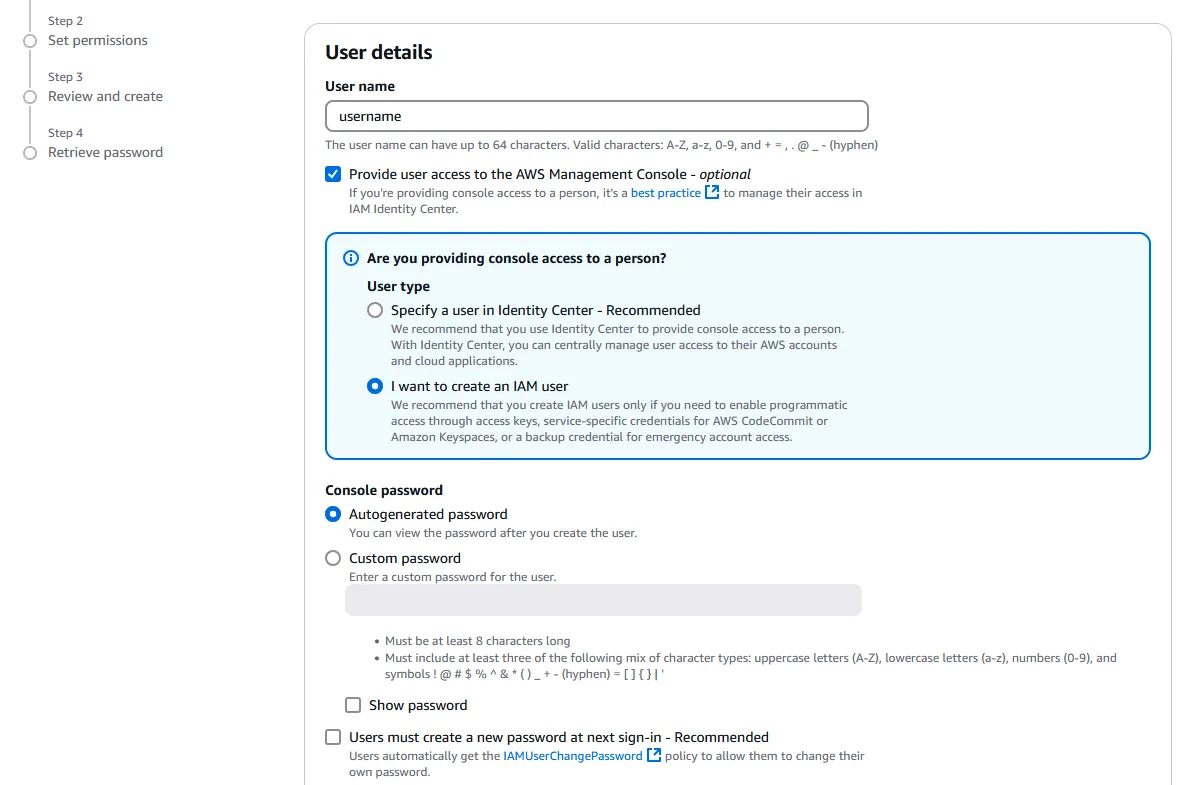
Enter your admin User name, then check “Provide user access to the AWS Management Console”. Under User type, select “I want to create an IAM user” to create a new user (unless we already have an existing user that we want to use). After selecting your password option, we can uncheck “Users must create a new password at next sign-in”, since we are making this new account for ourselves.
-
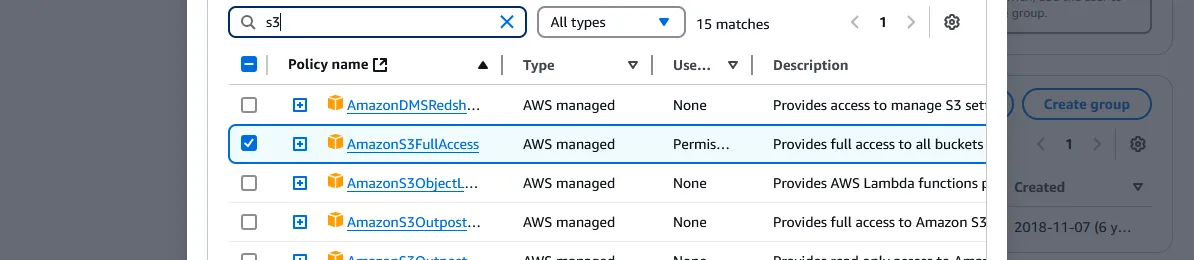
To set permissions, first we “Create group” on the right, and on the modal that pops up, we can choose which privileges we’d like to grant. For the purposes of the blog, we may type “s3” in the search, and select “AmazonS3FullAccess”. Or we could create a new policy with the button up top to define something more specific, such as perhaps only s3:PutObject and s3:GetObject to read and write to buckets. Alternatively, we could select the all encompassing “AdministratorAccess” to gain access to every resource and service if we envision ourselves exploring AWS much further, though at some security risk. All users created under the group will have all the policies we selected enabled. Give a User group name and press “Create user group”.
-
Back at the page where we set permissions for our new user, we can select “Add user to group” under Permissions options, check our newly created group. Press “Next”, then “Create user” on the next page. The final step lets us optionally download a CSV file of the user credentials.
Create an access key
-
Back at the user profile in IAM, click the “Security credentials” tab in the middle. Then scroll down a little and press the “Create access key” button on the right. This allows us to make calls to the AWS API, through the console and otherwise.
-
On the first page under Access key best practices & alternatives, select “Command Line Interface (CLI)”. Ignore the “Alternatives recommended” box and click on the “Confirmation” checkbox underneath it. The alternatives suggested are to run CLI on the browser, and to use their single sign-on (SSO) feature, which is overkill for this application. Press “Next” on the bottom, then “Create access key” in the page after it.
-
On this last page, we have access to download the access key id and the secret access key. The secret access key will ONLY be available at this time!! If it’s lost, we’ll have to delete the key and go through this process again. The access key id, on the other hand, will be available on the profile page for the User.
-
Safeguard the secret access key with your life.
Download and setup the AWS CLI
The AWS command line interface allows us to interact with AWS resources and services without using the browser. This is convenient for automation and integration into our pipeline. But to access the aws command on the console or shell, first we have to install it.
-
Follow the CLI user guide to install the latest version of AWS CLI. For Windows, we have to download and run the AWS CLI MSI installer.
-
Follow the Setup page to setup credentials. It will recommend short-term credentials, which is to use an “access token” to provide an expiration to CLI privileges. Long-term credentials have no expiration, so they are “Not recommended”. However, since we are granting access to ourselves, on our own private computer, adding an access token is somewhat frivolous if we could always generate another. If there is the possibility that another software engineer might steal your laptop and know exactly what to do with an AWS CLI, they might decide to upload porn to all your S3 buckets. Maybe I am trivializing this a bit, but I find that scenario incredulous. If you use short-term credentials, then I would hope you don’t save form data on the browser, since this could be the last of your worries. If someone broke into my house to steal my computer, then I would log into my root account and simply disable the access key. tl;dr If you’re using your own computer, use long-term. If you’re doing this for work, use short-term.
-
The long-term credentials tab on the carousel on this page suggests running
aws configureand entering some data. But perhaps the easiest way is to go to your%USERPROFILE%on a Windows machine, or in other wordsC:\Users\[Username]\, and create a folder named.aws. Inside, create two files namedconfigandcredentialswith the following contents.
Synchronize the blog from local
First, we have to navigate to the Astro project root.
We could delete and add completely new files every time we update the site.
However, this could be a waste of bandwidth and requests since most files are not changed in between updates. A better strategy would be to synchronize the updated local directory to the S3 bucket. aws s3 sync uses two strategies to determine whether a file has been updated:
- The file size has changed.
- The file has a newer create or modified date.
There is a --size-only option to ignore modified dates. We will be using this because Astro updates all .html, .css and .js files even if they haven’t been changed. Using size only comes with the peril that if a page doesn’t change in length (e.g. a color changes in CSS, or a paragraph is rewritten to the same number of characters), the file isn’t pushed to the bucket. This might be solved by appending a hash of the file at the end of every path, though at the cost of possibly making bookmarking a page harder. Well, that can be decision made at a later date.
Also, by default the sync only adds newly created files or files that have been changed. It doesn’t delete any files on the destination, unless the --delete flag is used. For our purposes, since the newer version should always be local, the synchronization should go from local to the S3 bucket, with the deleted files removed.
Rather than remember this command, it might be easier to add it to an npm run script in /package.json.
Conclusion
In the first part, we had a built static Astro site and we wanted to figure out how to host it. So we created an S3 bucket and used it as a static website host with public GET access. Then we connected our Porkbun domain to it. In Part 2, we created a Cloudfront CDN distribution with HTTPS support, then restricted the host permissions to control access only through the CDN. This prevents users from inadvertently or maliciously circumventing HTTPS and other security and analysis measures by accessing the hosted files directly. In this last part, we downloaded and configured the AWS CLI to be able to synchronize our local development builds to the S3 bucket, even put it into a npm run deploy script for ease of use.
From here, we could use object versioning so that the CDN immediately updates to newer versions of the site despite caching. We could also use AWS EventBridge to run a scheduler that runs a serverless Lambda function so that we can update the blog automatically every week. But these will be bridges to cross when I get there. I think to get a decently secure hosted site up and integrated into my development environment — that’s where we’re at, and it’s enough for now.